系统的 UISegmentedControl 是个挺方便的控件,这里来讲讲在 Swift3 下自定义 UISegmentedControl 的样式,包括修改底色,边框颜色等等。
要了解 UISegmentedControl 各个部分的组成,可以在官方的文档中找到 UISegmentedControl 文档 。着重注意这个图:
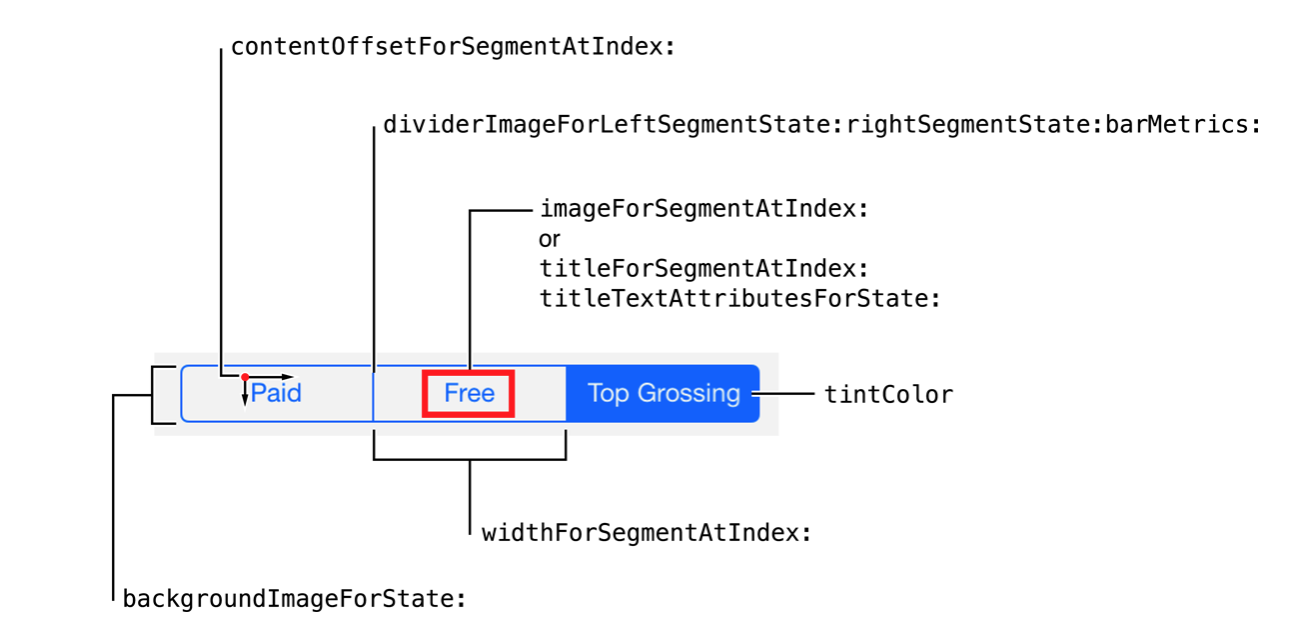
上面这幅图明确的列出了 UISegmentedControl 各个部分所控制的方法。下面就开始自定义吧。
首先我们先做一个通过颜色生成图片的的一个扩展方法:
1
2
3
4
5
6
7
8
9
10
11
12
13
14
| extension UIImage{
public class func renderImageWithColor(_ color: UIColor, size: CGSize) -> UIImage {
UIGraphicsBeginImageContext(size)
guard let context = UIGraphicsGetCurrentContext() else {
UIGraphicsEndImageContext()
return UIImage()
}
context.setFillColor(color.cgColor);
context.fill(CGRect(x: 0, y: 0, width: size.width, height: size.height));
let img = UIGraphicsGetImageFromCurrentImageContext()
UIGraphicsEndImageContext()
return img ?? UIImage()
}
}
|
接着,我们可以为 UISegmentedControl 建立一个可以自定义颜色的扩展方法:
1
2
3
4
5
6
7
8
9
10
11
12
13
14
15
16
17
18
19
20
21
22
23
24
25
26
27
28
29
30
31
32
| extension UISegmentedControl {
func setSegmentStyle(normalColor: UIColor, selectedColor: UIColor, dividerColor: UIColor) {
let normalColorImage = UIImage.renderImageWithColor(normalColor, size: CGSize(width: 1.0, height: 1.0))
let selectedColorImage = UIImage.renderImageWithColor(selectedColor, size: CGSize(width: 1.0, height: 1.0))
let dividerColorImage = UIImage.renderImageWithColor(dividerColor, size: CGSize(width: 1.0, height: 1.0))
setBackgroundImage(normalColorImage, for: .normal, barMetrics: .default)
setBackgroundImage(selectedColorImage, for: .selected, barMetrics: .default)
setDividerImage(dividerColorImage, forLeftSegmentState: .normal, rightSegmentState: .normal, barMetrics: .default)
let segAttributesNormal: NSDictionary = [NSForegroundColorAttributeName: UIColor.gray, NSFontAttributeName: UIFont.systemFont(ofSize: 14)]
let segAttributesSeleted: NSDictionary = [NSForegroundColorAttributeName: UIColor.white,NSFontAttributeName: UIFont.systemFont(ofSize: 14)]
setTitleTextAttributes(segAttributesNormal as [NSObject : AnyObject], for: UIControlState.normal)
setTitleTextAttributes(segAttributesSeleted as [NSObject : AnyObject], for: UIControlState.selected)
self.layer.borderWidth = 0.7
self.layer.cornerRadius = 5.0
self.layer.borderColor = dividerColor.cgColor
self.layer.masksToBounds = true
}
}
|
这个扩展方法我只暴露了三种颜色的修改,大家可以根据自己需求修改。
最后就是使用了,注意这里如果进行了自定义,不能用 autoLayout 了, 需指定 Segement 的位置大小,不然显示出来的效果被压缩成了一条线,我估计是 setBackgroundImage 的方法需要把 1x1 的颜色图片进行填充,如果不指定大小会出差错。
1
2
3
4
5
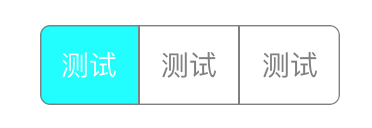
| let segment = UISegmentedControl(items: ["测试", "测试", "测试"])
segment.frame = CGRect(x: 0, y: 0, width: 150, height: 40)
segment.setSegmentStyle(normalColor: UIColor.clear, selectedColor: UIColor.cyan, dividerColor: UIColor.gray)
segment.selectedSegmentIndex = 0
view.addSubview(segment)
|
个人比较喜欢用 extension 扩展方法,这里大家直接拷贝就能够使用了,祝大家自定义愉快吧~